Publishing Reports in CI Pipelines
After Cycle generates a JUnit XML report, your CI system needs to publish it as test results. Publishing turns the XML file into the pipeline's native test view, with pass/fail counts, per-Scenario detail, history across builds, and the screenshots attached to each result.
The exact syntax varies by platform, but the workflow is the same:
- Run Cycle, usually through
cycle-cli, so the JUnit XML file is created. - Publish the XML file as test results, even when the Cycle step fails, so you still see which tests failed.
Use post { always { ... } } in Jenkins, condition: always() in Azure DevOps, or the equivalent in your CI system so reports are published on failed runs too.
This is the single most common configuration mistake.
A pipeline that stops at the failed test step never publishes the results that explain the failure.
The examples on this page call cycle-cli directly, which requires the Cycle Testing Kit to be installed on the agent that runs the job.
Cloud-hosted agent images do not include Cycle, so these pipelines normally run on a self-hosted agent prepared with Cycle and its browser drivers.
Jenkins
Jenkins reads JUnit XML through the JUnit plugin. Displaying the screenshots referenced in the report requires a second plugin.
Installing the required plugins
| Plugin | Purpose | Required for |
|---|---|---|
| JUnit | Parses the report and builds the Tests view | Test results |
| JUnit Attachments | Reads [[ATTACHMENT|path]] markers and archives the referenced files with the build | Screenshots |
Without the JUnit Attachments plugin, Jenkins still publishes Cycle test results correctly. The screenshots are simply ignored.
Configuring the Jenkins pipeline
Below is an example Jenkins pipeline that runs Cycle tests and publishes the JUnit XML report it generates:
pipeline {
    agent any

    stages {
        stage('Checkout') {
            steps {
                git url: '<your-repository-url>', branch: 'main'
            }
        }

        stage('Run Cycle Tests') {
            steps {
                catchError(buildResult: 'FAILURE', stageResult: 'FAILURE') {
                    bat 'cycle-cli run -p "%WORKSPACE%\\<your-project>.cycproj" -u <your-profile> -o "%WORKSPACE%\\Output" "%WORKSPACE%\\Playlists\\<your-playlist>.cycplay"'
                }
            }
        }
    }

    post {
        always {
            junit allowEmptyResults: true,
                  testResults: 'Output/**/*_junit.xml',
                  testDataPublishers: [[$class: 'AttachmentPublisher']]
        }
    }
}
Your pipeline script might need additional steps or configurations.
Replace the paths to match your environment.
The testResults path must match the directory you pass to -o.
-o-o (or --output-directory) overrides the Output directory from Reporting Settings for that run.
Passing it in the pipeline keeps the report location fixed in the pipeline definition instead of depending on the .cycuser file on the agent, which makes the publish glob predictable.
testDataPublishers in a Pipeline jobInstalling the JUnit Attachments plugin is not sufficient on its own.
In a Pipeline job you must also pass testDataPublishers: [[$class: 'AttachmentPublisher']] to the junit step, as shown above.
Without it the build publishes test results normally and the screenshots are ignored, with no warning in the build log.
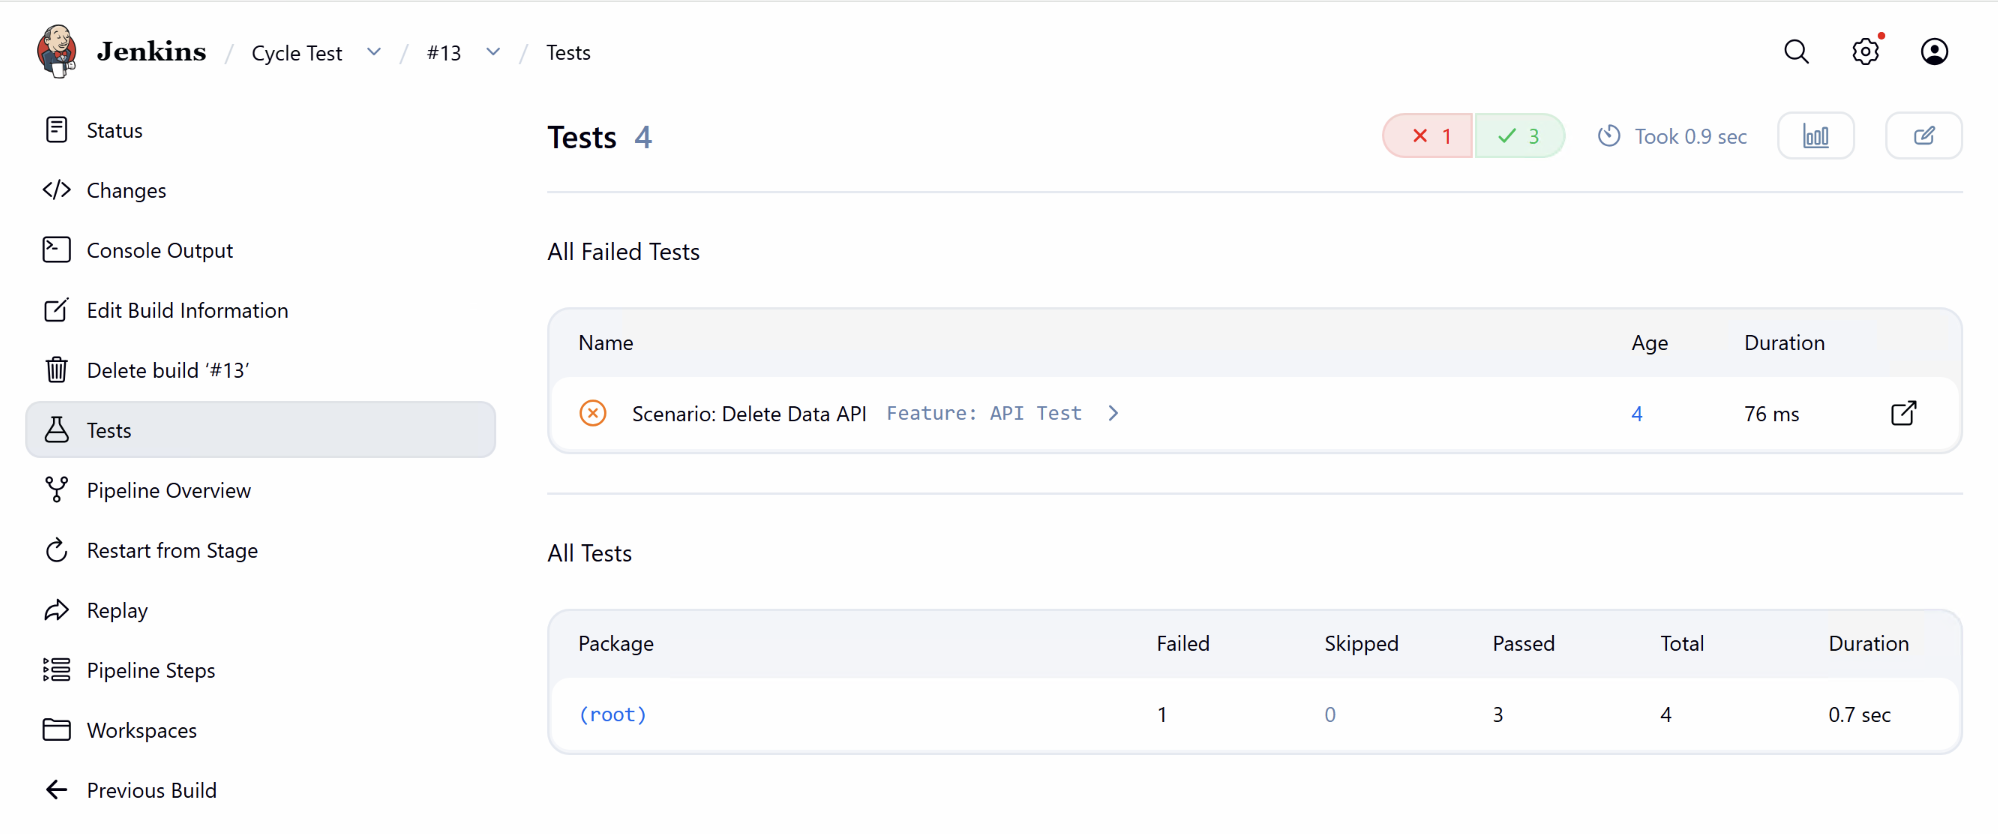
After a pipeline runs, the Jenkins Tests view lists each Scenario as a test case, summarizes pass and fail counts, and tracks failure history across builds.
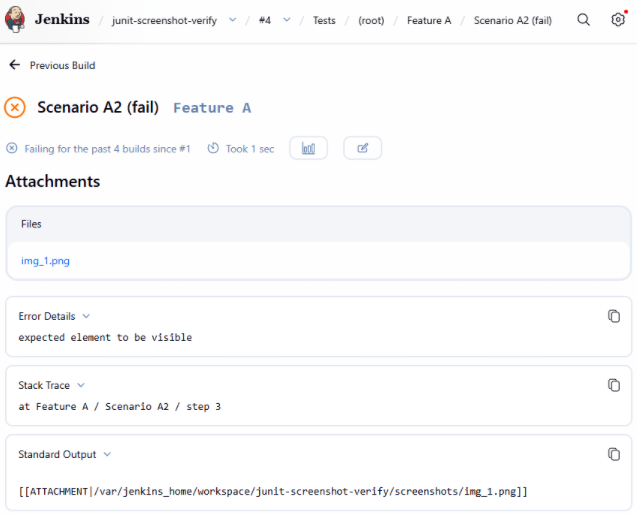
Open an individual test case to see its screenshots. Jenkins lists them in an Attachments section at the top of the page, where each file opens in its own view. Note that the attachments appear on the test case page itself, not in the expandable summary row on the Tests list.
The [[ATTACHMENT|path]] marker also remains visible under Standard Output on that page.
Seeing the marker there is normal and does not indicate a problem.
Azure DevOps
Azure DevOps publishes JUnit XML through the Publish Test Results task.
The task parses [[ATTACHMENT|path]] markers in each test case's <system-out> and uploads the referenced files as attachments on that test result.
No additional extension is required.
JUnit attachment support was added to the Publish Test Results task in Azure DevOps sprint 229. It is available in Azure DevOps Services and Azure DevOps Server 2022.2 or later. It is not available in Azure DevOps Server 2022.1 or lower. On those older self-hosted versions, test results publish normally but screenshots do not appear.
Configuring the Azure DevOps pipeline
Below is an example YAML pipeline that runs Cycle tests and publishes the report:
trigger:
  - none

pool: '<your-self-hosted-agent-pool>'

jobs:
  - job: CycleTests
    timeoutInMinutes: 0
    steps:
      - task: AzureKeyVault@2
        inputs:
          azureSubscription: '<your-service-connection>'
          KeyVaultName: '<your-key-vault>'
          SecretsFilter: 'CYCLE-APP-ID, CYCLE-APP-SECRET'
          RunAsPreJob: true
        displayName: 'Get Cycle credentials'

      - script: >
          cycle-cli run
          --clientid $(CYCLE-APP-ID)
          --client-credential $(CYCLE-APP-SECRET)
          -p $(Build.SourcesDirectory)\<your-project>.cycproj
          -u <your-profile>
          -o $(Build.SourcesDirectory)\Output
          "$(Build.SourcesDirectory)\Playlists\<your-playlist>.cycplay"
        failOnStderr: false
        continueOnError: true
        displayName: 'Run Cycle tests'

      - task: PublishTestResults@2
        displayName: 'Publish Cycle test results'
        condition: always()
        inputs:
          testResultsFormat: 'JUnit'
          testResultsFiles: 'Output/**/*_junit.xml'
          mergeTestResults: true
          failTaskOnFailedTests: true
The inputs that matter for Cycle reports:
| Input | Value | Why |
|---|---|---|
testResultsFormat | JUnit | Selects the JUnit parser. This is the task default, but stating it makes the pipeline clearer. |
testResultsFiles | A glob matching the directory passed to -o | Cycle writes reports into a timestamped subdirectory, so a recursive pattern is more reliable than a fixed filename. |
mergeTestResults | true | Reports one test run instead of a separate run per file when a group test produces several reports. |
failTaskOnFailedTests | true | Fails the build when Cycle tests fail. Defaults to false, which publishes results without failing the build. |
Set continueOnError: true on the Cycle step and condition: always() on the publish task.
Together these let the pipeline record the failure and still publish the results that explain it.
failOnStderr: false keeps ordinary diagnostic output on stderr from failing the step on its own.
Supply Cycle credentials from your secret store rather than the pipeline file.
The example reads them from Azure Key Vault with RunAsPreJob: true so they are available to every later step, then passes them through --clientid and --client-credential.
Add --skip-initial-purge when more than one Cycle run can share an agent or a workspace.
It skips the startup cleanup of internal database files, which otherwise interferes with parallel runs.
This parameter is deprecated and prints a warning, but it remains the supported approach until the underlying database change ships.
After the pipeline runs, the Tests tab of the run summary lists each Scenario. Select a test, then open the Attachments pane to see its screenshots. Azure DevOps previews image attachments inline, so you can review a failure without downloading anything.
Expect two kinds of attachment on a test result:
- The captured screenshots, named with the timestamp of capture, for example
1785505154048_screenshot.png. - A
Standard_Console_Output.logfile. Azure DevOps also surfaces the test case's<system-out>content as a console log, so this appears alongside the images.
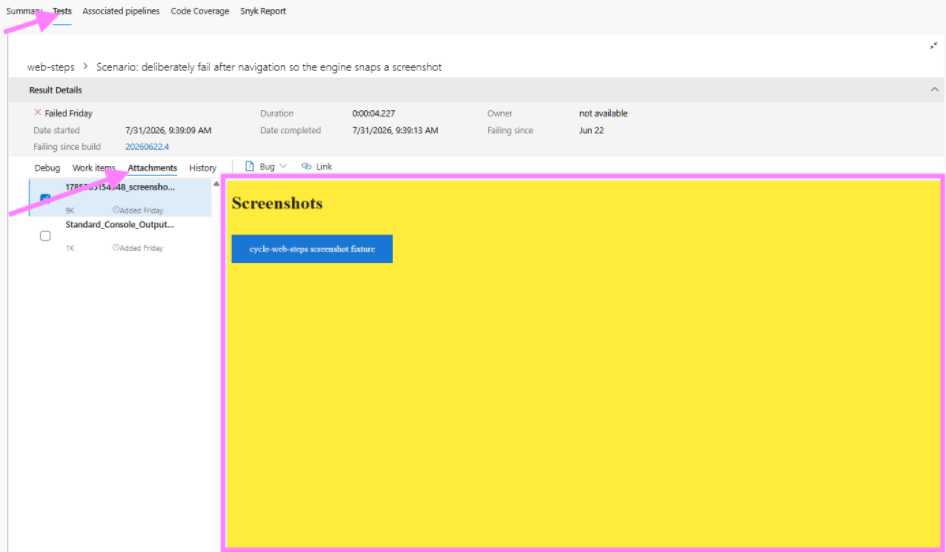
Attachments are tied to the test run.
Publishing the Cycle Output directory with PublishPipelineArtifact@1 also keeps the web report and CSV report available for download from the run summary.
Other CI systems
Cycle produces standard JUnit XML, so most CI platforms can consume the same file with their built-in test-reporting tasks. Test results publish reliably across platforms. Screenshot attachments are a different matter, because each platform resolves the referenced file paths its own way. Jenkins and Azure DevOps are the platforms Cycle supports for screenshot attachments.
| Platform | Test results | Screenshot attachments |
|---|---|---|
| Jenkins | JUnit plugin | Supported with the JUnit Attachments plugin. Absolute paths are used as-is. |
| Azure DevOps | Publish Test Results task | Supported on Azure DevOps Services and Server 2022.2 or later. Absolute paths are used as-is. |
| GitLab CI | Unit test reports | GitLab reads the same markers, but expects paths relative to $CI_PROJECT_DIR. The absolute paths Cycle writes do not resolve. |
| GitHub Actions | Workflow artifacts | No built-in JUnit test view. Use a marketplace action to publish results and upload the images as workflow artifacts. |
In each case, run cycle-cli first, then point the publish step at the JUnit XML file in your Cycle Output directory.
When your platform does not render the attachments, archive the output directory so reviewers can still open the images from the build.
Tips for pipeline success
- Publish on failure: Configure your CI publish step to run even when Cycle fails so failed Scenarios still appear in the test report view.
- Use a consistent output path: A fixed filepath or a simple glob pattern makes CI configuration clearer than timestamped filenames unless your pipeline already handles dynamic names.
- Publish from the machine that ran the tests: Screenshot paths in the report are absolute. See Understanding screenshot paths.
- Keep secrets out of source control: Store Cycle tokens and credentials in your CI secret store, not in job scripts or
.cycuserfiles committed to the repository. - Combine with other Cycle reports: JUnit XML is ideal for CI dashboards. You can still enable web reports, CSV reports, or data store logging when you need deeper local analysis or long-term trending outside CI.