JUnit XML Reports
JUnit XML reports are an industry-standard format for sharing automated test results. The report is a single XML file that lists test case names, pass/fail status, execution time, and error details when a test fails. Nearly every test framework can produce JUnit XML, and nearly every Continuous Integration (CI) system can consume it to display rich test result views, store historical trends, and highlight recurring failures across pipeline runs.
Cycle can optionally generate a JUnit XML report after a Feature, Playlist, or Group Test finishes. This makes Cycle behave like other standard test automation tools and gives pipeline users better visibility into Cycle test results without extra conversion steps.
For background on where these settings live in the Cycle client, see Cycle Reporting Settings.
Why Generate JUnit XML Reports?
If you run Cycle tests in a CI pipeline, JUnit XML reporting is the fastest way to get actionable test results inside that pipeline. With JUnit XML enabled, your CI system can:
- Display pass/fail summaries and drill-down details for each test case
- Persist test history across pipeline runs
- Surface failure trends over time
- Fail or warn a build based on test outcomes alongside other pipeline checks
Because JUnit XML is widely supported, the same Cycle report file can be published through Jenkins, Azure DevOps, GitLab CI, GitHub Actions, and most other CI platforms with minimal additional configuration.
Configuring Cycle to Generate JUnit XML Reports
JUnit XML reporting is controlled from Reporting Settings in the Cycle client. These are user settings stored in your .cycuser file and are not shared as part of a Project.
Open Settings from the Project Directory, then select Reporting Settings. In the Reports In Use section, turn on Produce JUnit XML report.
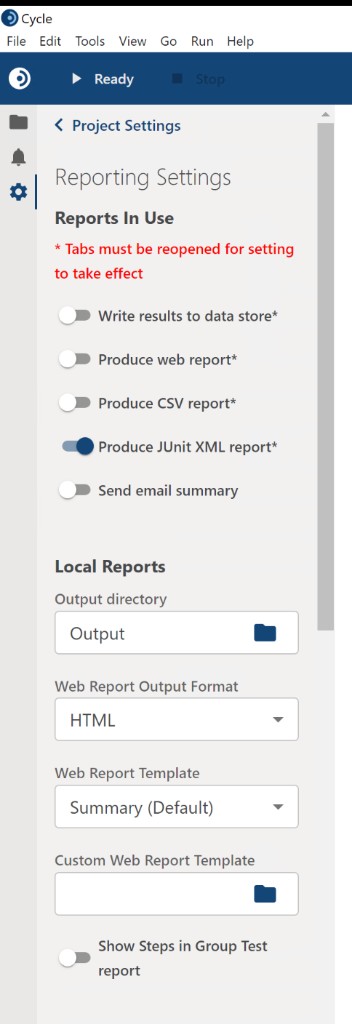
When enabled, Cycle writes a JUnit XML file at the end of each test run that produces reporting output.
In the Local Reports section, set Output directory to the folder where Cycle should write the JUnit XML report. This is the same output directory used for web reports, CSV reports, and saved execution images.
The path may be absolute or relative to your Project directory, for example Output or C:\Cycle\Output. Make sure the directory exists or that Cycle has permission to create it. If you run tests from cycle-cli in CI, choose a location inside your workspace or agent output folder so the CI system can publish the file as a build artifact.
After configuring these settings, Cycle will generate JUnit XML report files into a timestamped directory under the specified output folder.
Configuring CI Pipelines to Consume JUnit XML Reports
After Cycle generates the XML file, configure your CI system to publish it as test results. The exact syntax varies by platform, but the workflow is the same:
- Run Cycle (usually via
cycle-cli) so the JUnit XML file is created. - Publish the XML file as test results, even when the Cycle step fails, so you still see which tests failed.
Use condition: always() (Azure DevOps), post { always { ... } } (Jenkins Pipeline), or the equivalent in your CI system so reports are published on failed runs too.
Jenkins
Jenkins natively understands JUnit XML through the JUnit plugin. Below is a simple example Jenkins pipeline that shows how to run Cycle tests and publish the JUnit XML report it generates:
pipeline {
    agent any

    stages {
        stage('Checkout') {
            steps {
                git url: '<your-repository-url>', branch: 'main'
            }
        }

        stage('Run Cycle Tests') {
            steps {
                catchError(buildResult: 'FAILURE', stageResult: 'FAILURE') {
                    bat 'cycle-cli run "path\\to\\tests"'
                }
            }
        }
    }

    post {
        always {
            junit allowEmptyResults: true, testResults: 'Output/**/*_junit.xml'
        }
    }
}
Your pipeline script might need additional steps or configurations. Replace the paths to match your environment. The testResults path must match your Cycle Output directory.
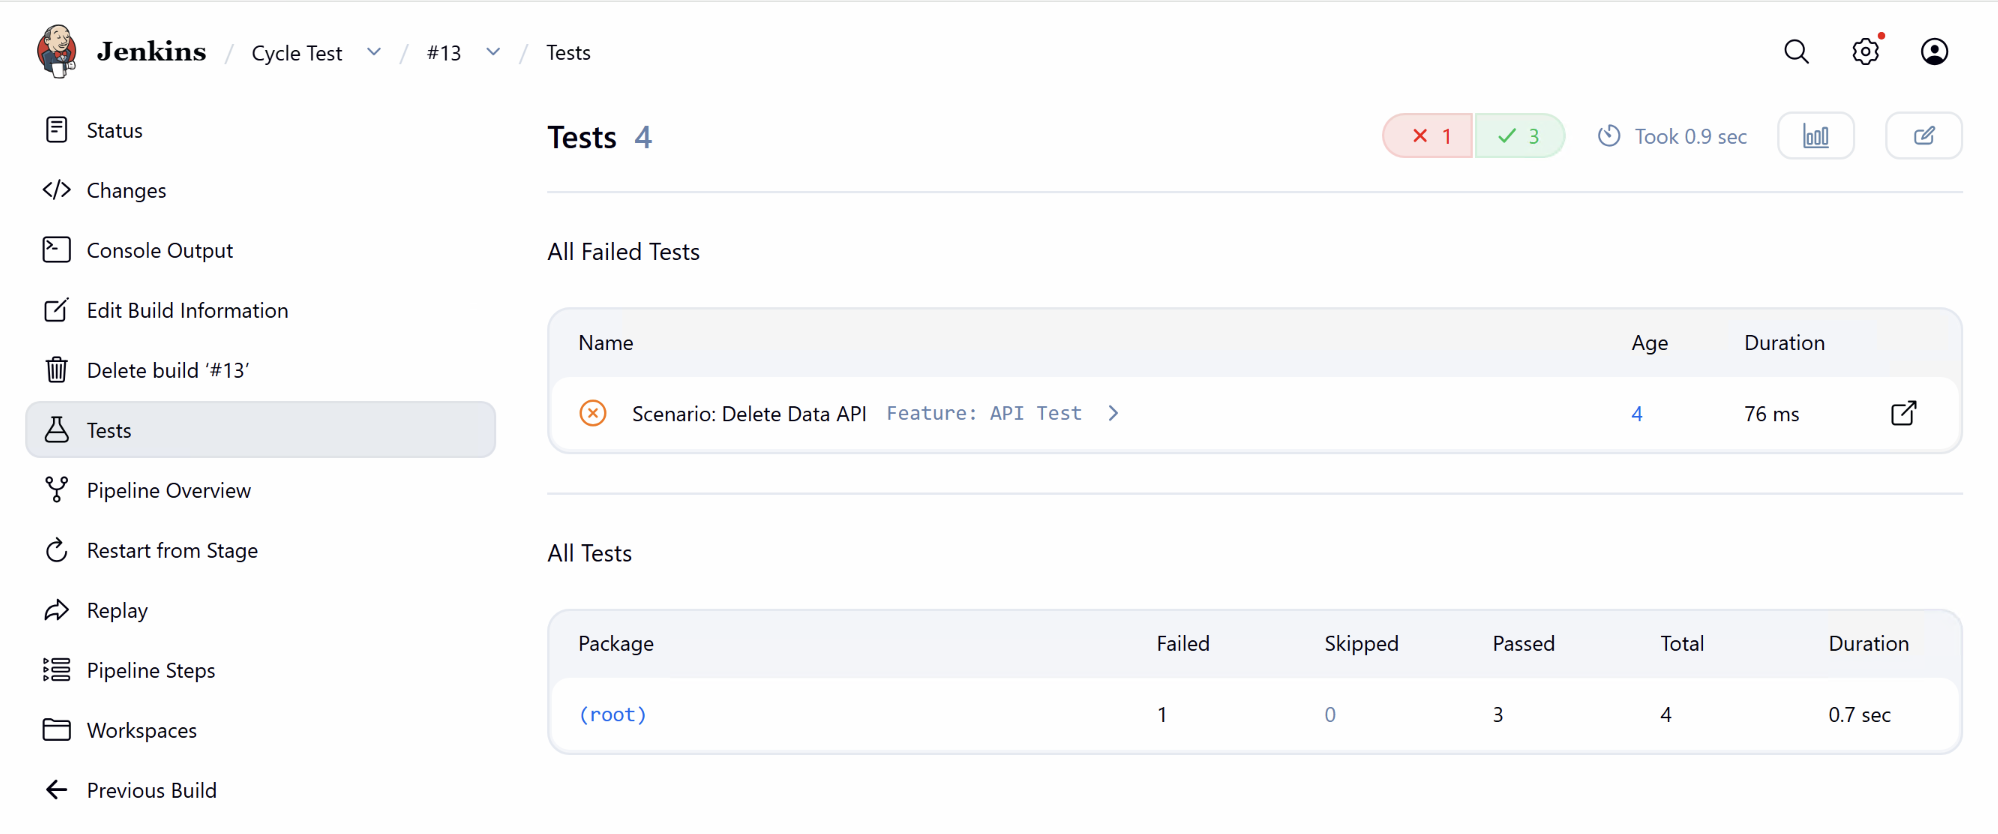
After a pipeline runs, the Jenkins Tests view lists each Scenario as a test case, summarizes pass and fail counts, and tracks failure history across builds.
Other CI Systems
Cycle produces standard JUnit XML, so most CI platforms can consume the same file with their built-in test-reporting tasks. Consult your platform's documentation for publishing JUnit XML from a pipeline:
- Azure DevOps — Publish Test Results task
- GitLab — Unit test reports
- GitHub Actions — Publishing test results
In each case, run cycle-cli first, then point the publish step at the JUnit XML file in your Cycle Output directory.
Tips for Pipeline Success
- Publish on failure. Configure your CI publish step to run even when Cycle fails so failed Scenarios still appear in the test report view.
- Use a consistent output path. A fixed filepath (or a simple glob pattern) makes CI configuration easier than timestamped filenames unless your pipeline already handles dynamic names.
- Keep secrets out of source control. Store Cycle tokens and credentials in your CI secret store, not in job scripts or
.cycuserfiles committed to the repository. - Combine with other Cycle reports. JUnit XML is ideal for CI dashboards. You can still enable web reports, CSV reports, or data store logging when you need deeper local analysis or long-term trending outside CI.